

There are many contractors on a jobsite and knowing who you need when you need them is important to staying on top of any construction project. This guide explains the different roles of contractors in building an Accessory Dwelling Unit (ADU) and who you need to get the job done right.
The Contractors needed to build an Accessory Dwelling Unit
It will take a team of specialty contractors to build an Accessory Dwelling Unit (ADU). Some contractors, like General Contractors, will have multiple skillsets that can cover multiple specialties. Most are Specialty Contractors that just focus on one thing. Here is a list of specialty contractors to give you an idea of each of their roles:
- Surveyor
- Drafter
- Project Manager
- Engineer
- Designer
- Energy Consultant
- Mason
- Sewer
- Carpenter
- Electrician
- Plumber
- Insulation
- HVAC
- Drywaller
- Painter
A Surveyor’s role in building an Accessory Dwelling Unit
A surveyor will be needed if the town requires the property line to be marked when building a detached or add-on Accessory Dwelling Unit (ADU). This is usually done to determine if the position of the ADU meets the minimum setback requirements for your zoning.

Where To Build an ADU?

Once you know that you can build an Accessory Dwelling Unit (ADU) on your property, then it will be time to determine where the best place to put it is.

Continue Reading
A Drafter’s role in building an Accessory Dwelling Unit
"One picture is worth a thousand words." -English Proverb
Drawings are the best way to show your project goals and they will be needed throughout your project for different purposes.
- Permitting
- Bidding
- Contractors
Many Design and Engineering firms have Drafters on staff to provide you with the drawings you will need. Here is an example of a plat drawing showing how the construction of the New Accessory Apartment does not encroach on the minimum setback of 15′ for this property.
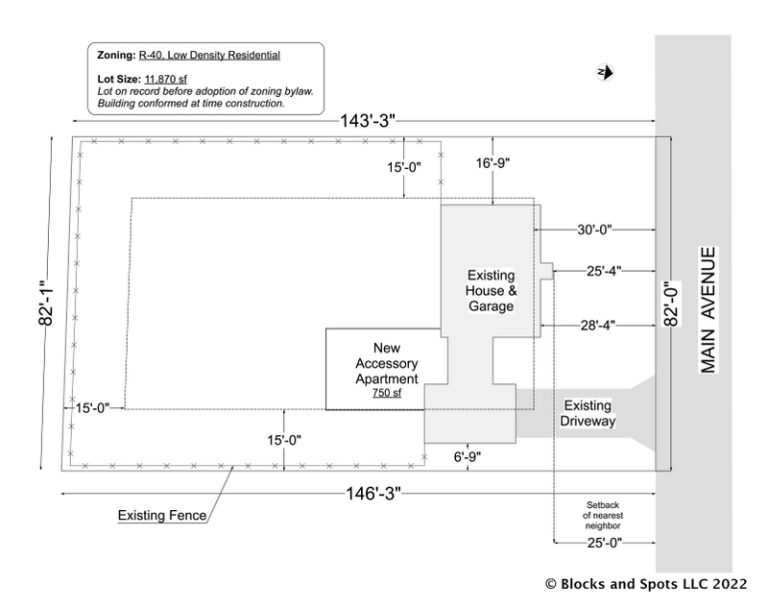
Add-on ADU – Example Plot Plan 2
[click here for more Info]
A Project Manager’s role in building an Accessory Dwelling Unit
It’s should be appreciated that contractors are independent businesses that generally only work within their particular field of expertise. You should never expect contractors to have a complete view or understanding of the whole project. This is the job of a Project Manager (PM). They are knowledgeable in the different contracting fields and have experience in the time, cost, and reasonable expectations of each contractor’s job.
A PM will employ a number of different techniques to keep a project on track. While the methods used by a PM to keep things organized will vary, the components they manage are generally the same.
- Scheduling
- Budgeting
- Materials
- Coordination
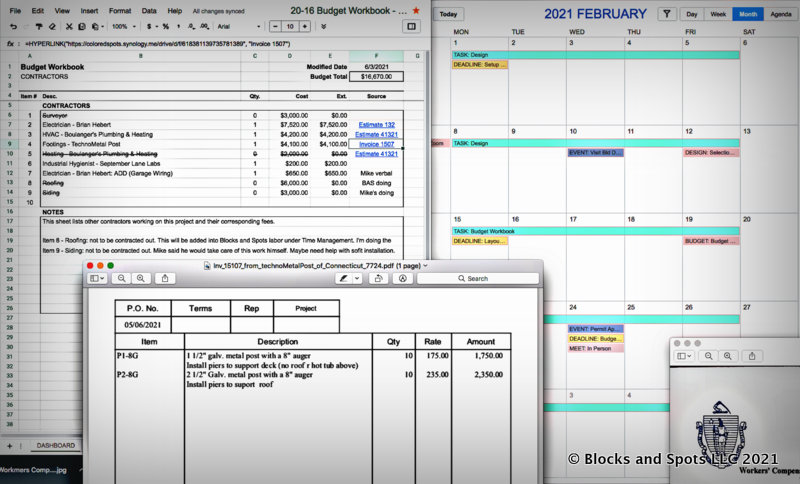
Project Management Example

Project Manager (PM) can be a full time job. If you're considering being the PM for your Accessory Dwelling Unit (ADU), then make sure you have enough time to devote to the job.
An Engineer’s role in building an Accessory Dwelling Unit
There are many different types of Engineers. Depending on the type and location of your ADU, a structural Engineer will be needed to properly size the following:
- Foundations
- Floors
- Walls
- Roofs
Detailed drawings are needed for permitting to show that the weight of an ADU can be adequately supported. This is of particular importance when building an ADU inside an existing structure. Here is an example showing the structural loads of a building and how they are transferred through the frame.
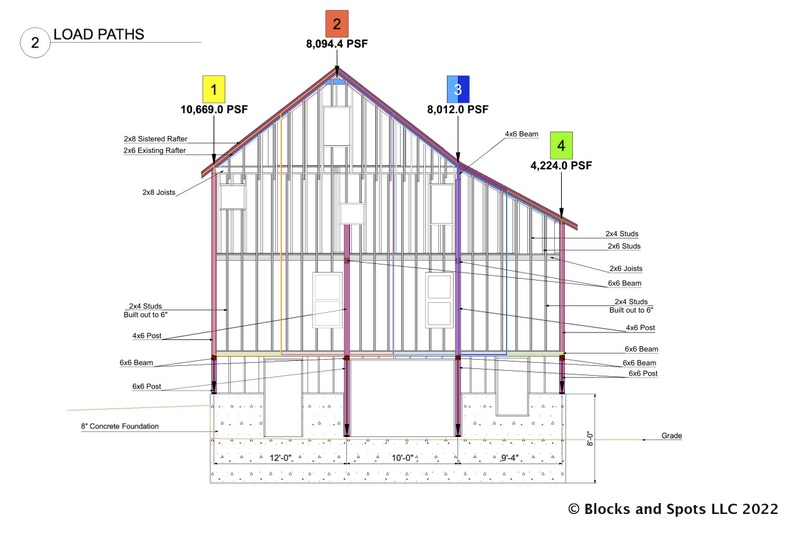
Built-in ADU – Load Path
[click here for more Info]
The example above was used to determine if a 750 sq foot Accessory Dwelling Unit (ADU) would be adequately supported by the structure of an 1880s barn. Structural Engineers can inspect and survey a building to determine the strength of its construction and how much additional load (weight) will be added after the ADU is built.
A Designer’s role in building an Accessory Dwelling Unit
How an Accessory Dwelling Unit (ADU) is designed will determine how it’s used. It’s important to consider the main purpose of an ADU when looking for a Designer. Asking “Who will use it?”, is the first step to determining your design path. Here are some “use” examples you can consider:
- Aging in Place – elderly accessible
- Short-term Rental – vacation rental (Airbnb, Vrbo, etc.)
- Long-term Rental – tenant or lessee
Once you know what type of Accessory Dwelling Unit (ADU) you want to build, then it’s time to think about design. Hiring a Designer is an important step to making sure the ADU will be used to its fullest potential.
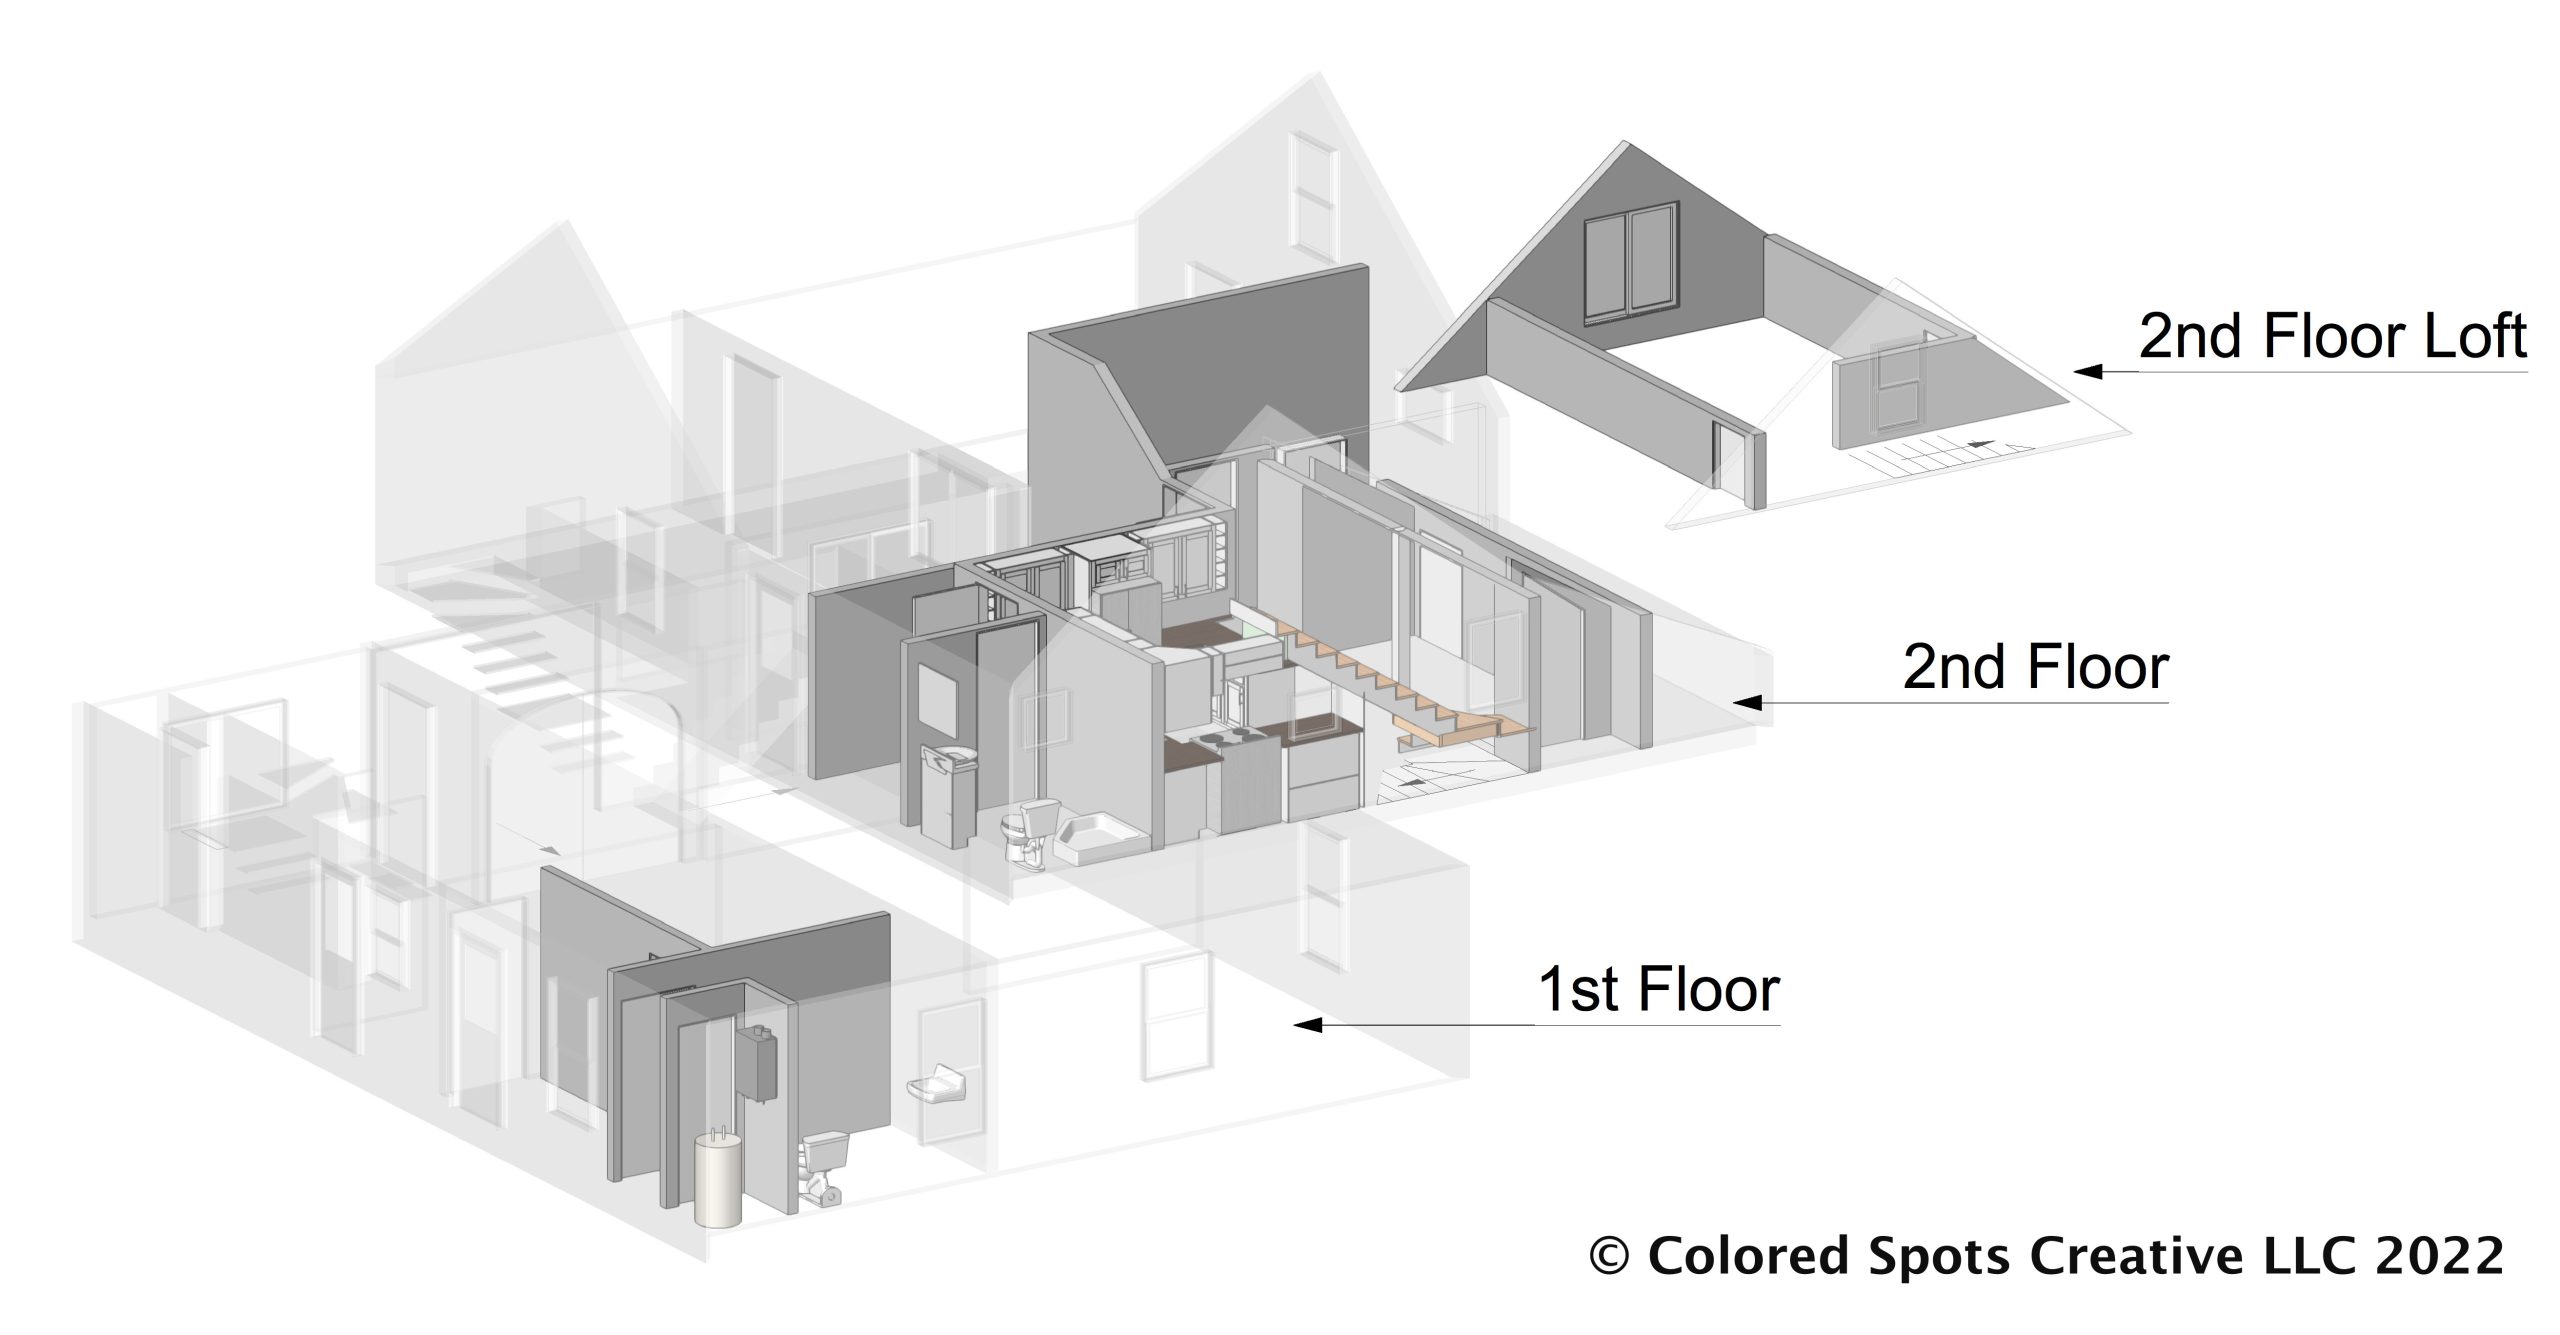
3D Render – ADU Design – Hayloft
A Designer can help with the following:
- Paint Colors
- Space Planning
- Kitchen Cabinets
- Door Swings
- Floor Layout
- Closet Placement
A good Designer helps make your dreams a reality.
An Energy Consultant’s role in building an Accessory Dwelling Unit
An Energy Consultant is a relatively new role in building an Accessory Dwelling Unit (ADU). The need for more efficient housing has led to many improved ways to heat and cool a space. Hiring an Energy Consultant will provide you with methods of construction that will greatly increase the efficiency of an ADU and lower the overall cost of utilities.
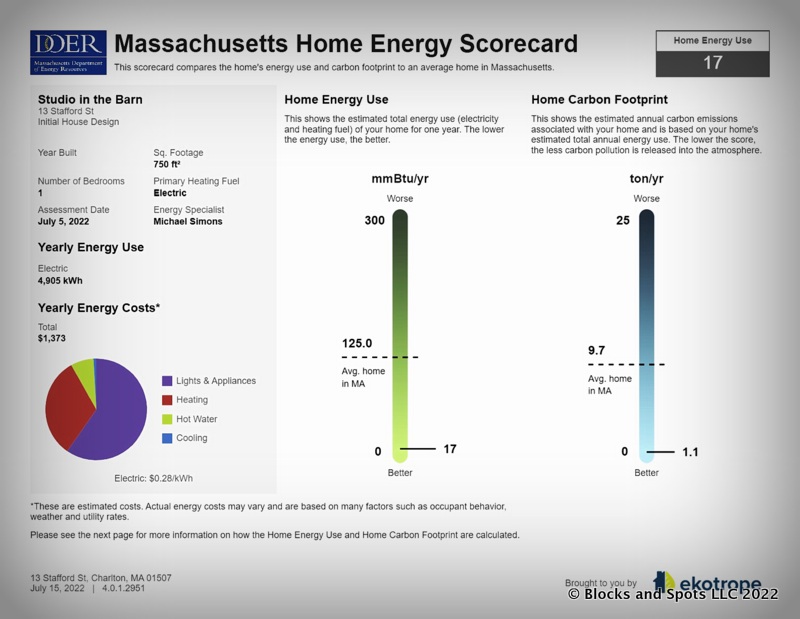
Energy Evaluation Example

Energy Consultants that are Home Energy Rating System (HERS) qualified can also enroll you in cost-saving incentives and rebates that will lower the costs of building an ADU. You can check with ENERGY STAR to see what incentives are available in your state.
Nationwide Incentives
energystar.gov
A Mason’s role in building an Accessory Dwelling Unit
Every building needs a foundation. Depending upon where you choose to build your Accessory Dwelling Unit (ADU) a Manson may be needed. These are the different types of Mason contractors:
- Brick – manufactured blocks
- Stone – natural stone and tile
- Concrete – monolithic pours
- Veneer – cosmetic stone
- Gabion – rubble filled wirework frames
- Composite – styrofoam and concrete
While brick, stone, and concrete are the most traditional foundation materials, there are some alternative foundation materials available that don’t require a Mason. You can check with your local building code to see if one of these might be right for your ADU:
- Helical Pile – big metal screws drilled into the ground
- Earth Bag – compacted earth in a polypropylene bag
- Treated Wood – sunk ground contact pressure treated lumber
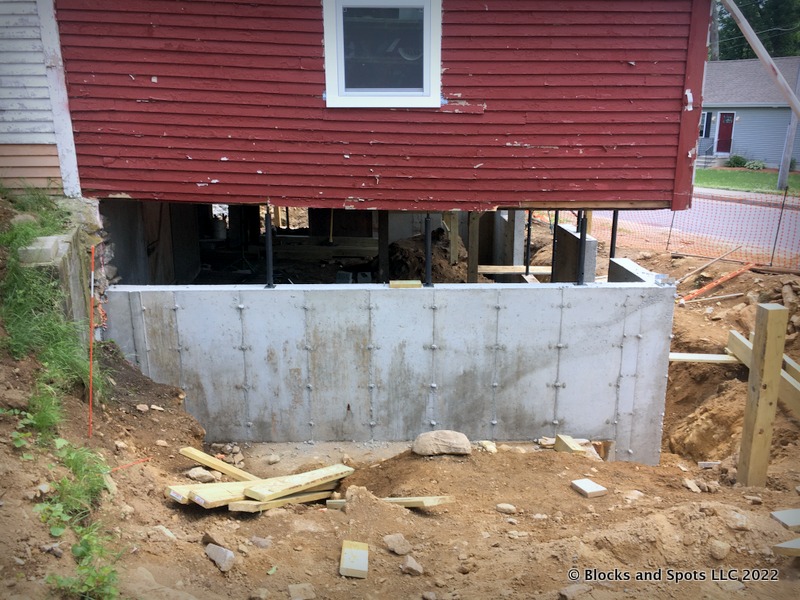
Concrete Foundation Example
Never assume an existing foundation is strong enough to support an Accessory Dwelling Unit (ADU).
A Sewer’s role in building an Accessory Dwelling Unit
Waste water needs to go somewhere. Knowing what type of Sewer system you have will determine who you will need to install the Sewer for your Accessory Dwelling Unit (ADU). The different type of sanitary sewer systems are:
- Septic – piped to an onsite tank
- Sewerage (aka Town Sewer) – piped to an offsite treatment center
There are specific Septic companies that deal with the service and maintenance of onsite Septic Systems. Septic Systems are sized to accommodate a specific number of Bedrooms. It is important to determine if your Septic System is big enough to handle the addition of an ADU. If you don’t know how many Bedrooms your Septic System can support, contact the Septic company responsible for your service and maintenance.
Sewerage Systems is a collection of smaller pipes going to larger pipes that eventually lead to a treatment plant somewhere in your municipality. The size of the pipe going from your house to the street determines how much flow your Sewerage System can handle. Contact your municipality’s Sewer Department to see if you can add an Accessory Dwelling Unit (ADU) on to your existing Sewerage System. They will have a connection card for your building detailing the size of the Sewer pipe.
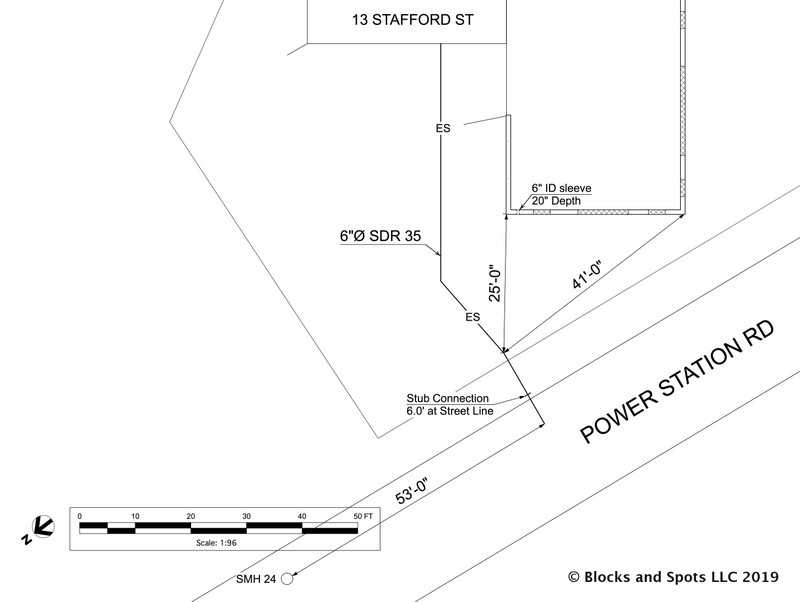
Example of Sewerage Piping
The Carpenter’s role in building an Accessory Dwelling Unit
Wood is the most common building material. This means you’ll more than likely need a Carpenter to build your Accessory Dwelling Unit (ADU). There are 2 major classes of Carpentry
- Rough – structural
- Framer – walls, sheathing, windows, and doors
- Joister – supports and beams for floors and decks
- Roofer – rafters, trusses, and covering
- Finish – visible
- Flooring – wood floor
- Trim – casings around doors and windows
- Moulding – details that cover gaps and edges
- Staircases – steps, stoops, and ramps
- Cabinets – kitchens, bathrooms, and built-ins

The Rough Carpenter will take the ADU plans and build to the Design Specification, Building Code, and Material Strengths. Rough Carpentry is considered complete when the frame is enclosed and protected from the weather, known as dry-in. Once this step is complete a rough inspection is done by the municipality to ensure the rough work was done properly
After the inspection, it’s time for these contractors to come in and do their work:

Once the other contractors have finished their parts the Finish Carpenter comes in to install all the finishing touches. They are usually the last contractor to work before an Accessory Dwelling Unit is considered finished. Flooring, stairs, doors, casings, cabinets, countertops, trim, moulding, handles and hardware all fall under Finish Carpentry.
An Electrician’s role in building an Accessory Dwelling Unit
The most used utility for an Accessory Dwelling Unit (ADU) will be electricity. An ADU will add a substantial power draw to any existing electrical system. It will be important to check if your existing electrical panel can support the additional load of an ADU.
It’s not uncommon to need an electrical service upgrade to support an Accessory Dwelling Unit. Some states may also require a separate meter for each living space. Check with your local municipality to see what the law is.

New Electrical Service Example
Dealing with a Electrical Service Provider takes time. On the recent Barn ADU I built, it took 8 months to go from intitial application for a new service to actually getting a meter installed and power on. Plan ahead!
There are 2 major types of Electrical work needed to build an Accessory Dwelling Unit:
- Rough-in
- Finishing

The Rough-in happens right after the Carpenters have completed the Rough Framing of an ADU. At this stage, the breaker panel is installed and all the electrical boxes are placed for the outlets, light switches, fixtures, and fans. The wires are run through the walls and into the boxes but nothing is attached or connected. Once this step is complete a rough inspection is done by the municipality to ensure the rough work was properly done.

The Finishing happens after the walls are Drywalled and Painted. At this time the wires are connected to the outlets, light switches, fixtures, and fans. Then in the breaker panel, the wires are connected to fuses. The power is turned on and everything gets tested to make sure it’s working properly. Once this step is complete a final inspection is done by the municipality to ensure the finishing work was properly done.
A Plumber’s role in building an Accessory Dwelling Unit
The distribution of potable water (drinkable) within an Accessory Dwelling Unit (ADU) to fixtures and the removal of wastewater is done through pipes. Those pipes are usually installed in the walls, ceiling, and floor.
There are 2 major types of Plumbing work needed to build an ADU:
- Rough-in
- Finishing

The Rough-in happens right after the Carpenters have completed the Rough Framing of an ADU. At this stage, the drain pipes are laid from the fixtures to the sewer along with lines carrying hot and cold water. An important component of waste pipes is that they need to be vented up to a vent stack at each connection. Once this step is complete a rough inspection is done by the municipality to ensure the rough work was done properly.

The Finishing happens after the walls are Drywalled and Painted, the Flooring is installed, and the Cabinets are put in. At this time sinks, showers, tubs, toilets, fixtures and appliances are plumbed and connected to water. The water is turned on and everything gets tested to make sure it’s working properly. Once this step is complete a final inspection is done by the municipality to ensure the finishing work was done properly.
The Insulation role in building an Accessory Dwelling Unit
Insulation is a major consideration in how efficient an Accessory Dwelling Unit (ADU) will be. There have been a lot of changes to the building code regarding Insulation in the last few years and an Energy Consultant can assist you in choosing the right types of insulation to keep your ADU comfortable and cozy year-round and have the lowest utility costs.

Insulation Example
Air infiltration in an Accessory Dwelling Unit (ADU) can quickly affect the efficiency of heating and cooling systems making these systems cost more to run and operate. Air Sealing an ADU will go a long way in providing a more comfortable interior and lowering operational costs. The biggest air leakage occurs in floors, walls, and roofs. Applying sealants and air barriers to these areas during construction is the best way to create an air-tight seal in your ADU.
Proper Air Sealing can save you 30% on your utility costs alone.
An HVAC’s role in building an Accessory Dwelling Unit
HVAC stands for Heating, Ventilation, and Air Conditioning. To be considered habitable, an Accessory Dwelling Unit (ADU) has to have a permanent heat source. Traditional heat sources would come from wood, oil, natural gas, or propane. These fuels would be burned in a furnace to heat air or water that would then be circulated around a house via pipes or ducts. Electric resistant heating can be seen in more modern buildings.
ADUs can now take advantage of new electric mini-split systems for heat. Advancements in heat pump technology have created low ambient systems that can operate at temperatures down to -40°F. Another advantage of using a heat pump for your Accessory Dwelling Unit is that the heat pump can also be used to cool your ADU during the Summer outside.
Because it's easier to move heat than to generate it, mini-split systems use 3-1/2 times less electricity than traditional resistant heating elements. Less is more when it comes to saving money on your electric bill.
HVAC installers also install vents in the kitchen and bathroom. And as ADUs become more air-tight, Energy Recovery Vents (ERV) are needed to maintain healthy indoor air quality. HVAC installers can also install these.

Energy Recover Vent (ERV) Example

A Drywaller’s role in building an Accessory Dwelling Unit
The most common material used to cover Rough Framing is Drywall. Drywall is a mixture of gypsum and plaster sandwiched between two sheets of paper. Also, known as gypsum board, this material is preferred because it is non-combustible and provides a degree of fire protection. Drywall has these 6 levels of finish:
- Level 0 – Rough: No taping, no compound
- Level 1 – Concealed spaces: All joints and interior angles are taped and set with 1 coat of compound.
- Level 2 – Unfinished areas: 2nd coat of compound over joints and interior angles plus 1st coat on fastener heads then rough sanding once set.
- Level 3 – Wallpaper or heavy covering: 3rd coat of compound over joints and interior angles, plus 2nd coat on fastener heads, then finish sanding when set.
- Level 4 – Flat paints: 4th coat of compound over joints and interior angles, plus 3rd coat on fastener heads, then finish sanding when set.
- Level 5 – Gloss paints: Skim coat of compound is applied to entire drywall surface, then finish sanded when set.
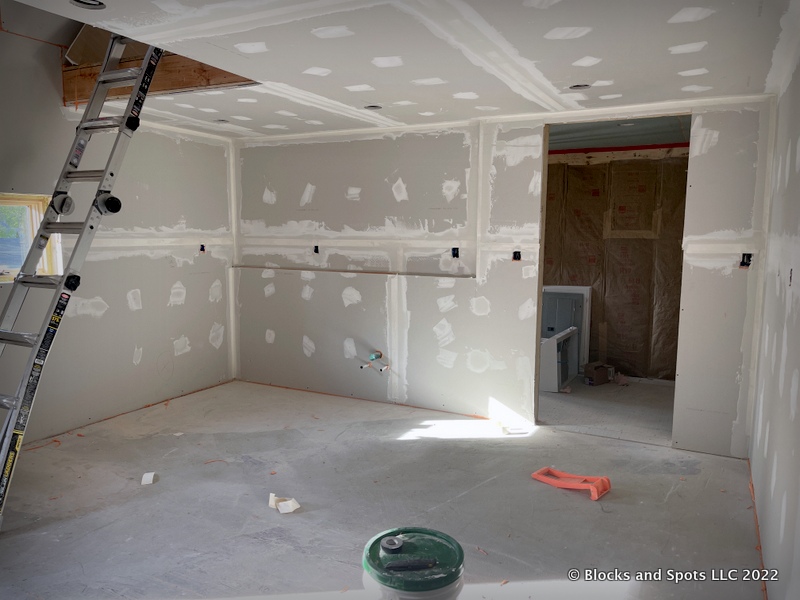
Level 2 Drywall Example

A Painter’s role in building an Accessory Dwelling Unit
Painting is a great part of building an Accessory Dwelling Unit. It makes everything start to feel finished. Once drywalling is finished and the Painter applies a seal coat, that is the transition from rough to finish construction. Here is what a Painter is generally responsible for when building an ADU:
- Ceilings
- Walls
- Doors
- Windows
- Trim
- Moulding
A Painter can offer some advice on colors but is not usually responsible for picking them. When it comes to choosing colors, it’s best to consult with a Designer.
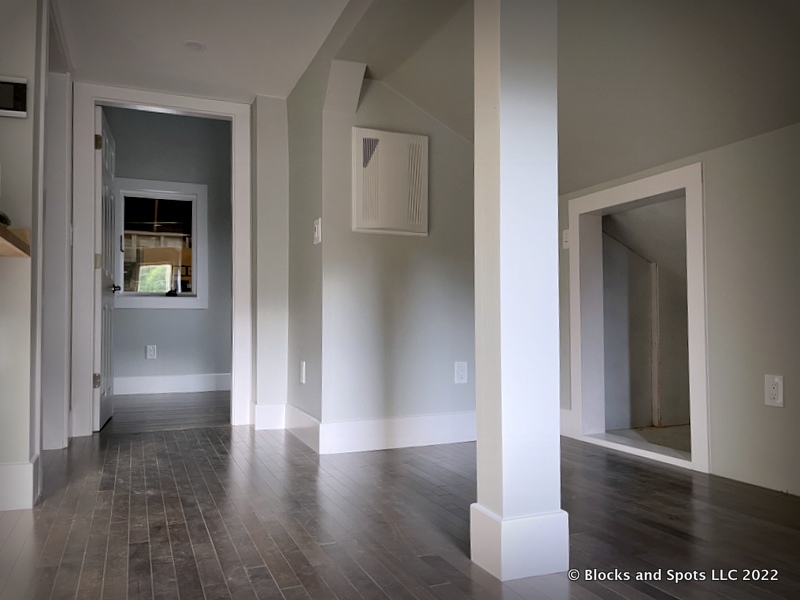
Painting Example

Thanks for Reading!
Research and Planning are important in figuring out if an Accessory Dwelling Unit is right for you. It took 8 months for me to build the ADU Barn Studio and most of that time was spent setting everything up.
The next blog is Design and Engineering, where I’ll take you through important things to consider when building your ADU.
You can subscribe here ADU Barn Studio – Intro to get notifications when the next blog comes out in this series.
And as always if you like what you read and want to show your appreciation, you can buy me a coffee by clicking on the coffee button below.
Cheers!